
Building a Repurposed Windows Greenhouse


Repurposed Windows Greenhouse
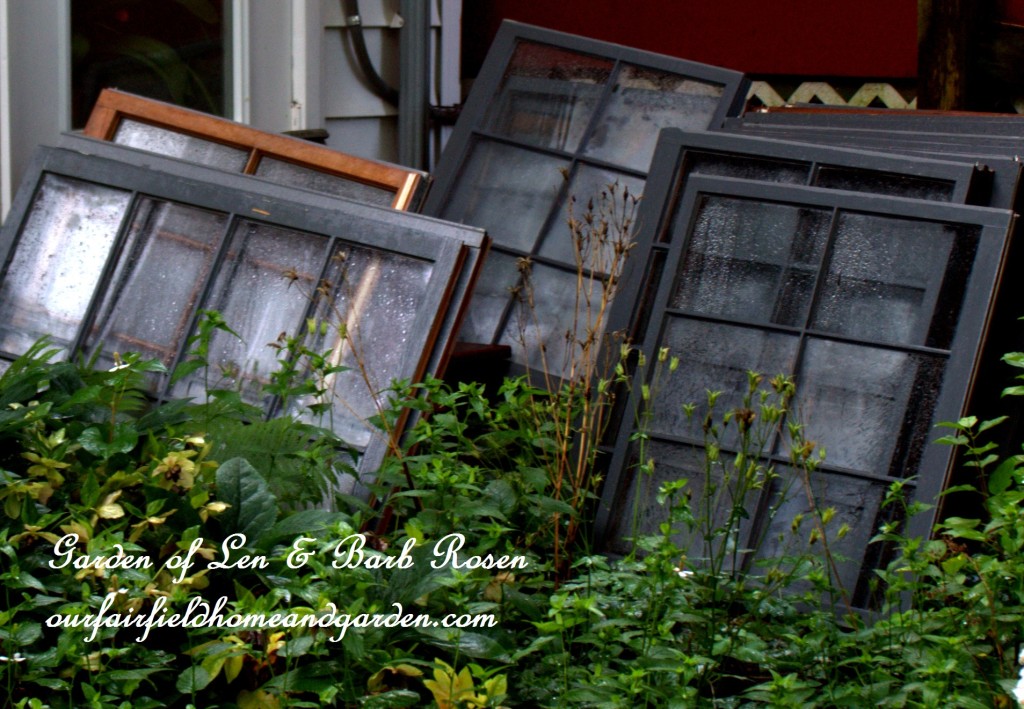
It all started with three antique windows. I had no idea why, but at $5 each, they had to come home from that yard sale with me. As my new treasures sat in the basement, my mind started percolating ideas on how to put them to use in our garden. They were too fancy for a coldframe and I didn’t want to mar their simplicity by covering them in paint or gee-gaws. But when I saw pictures on-line of greenhouses made from old windows, I knew that was the right kind of project to highlight them.
And, a greenhouse structure would fulfill my long-standing dream. For years and years, I have schemed on having a greenhouse of my own. But the costs of having a commercial build or even kit built were out of my budget. I didn’t want heavy-duty plastic on a pvc frame either, I wanted a permanent structure!
It took a year and a half of gathering windows from friends and family who were having window replacement home renovations. (contact window replacement companies – they often throw old windows in the landfill!) I stored them under tarps on a deck and in the garage. As it turns out, I could have started earlier, but I had no idea how many windows or sizes the greenhouse build would take. (I ended up using 28 windows and giving 40 away on craig’s list!)
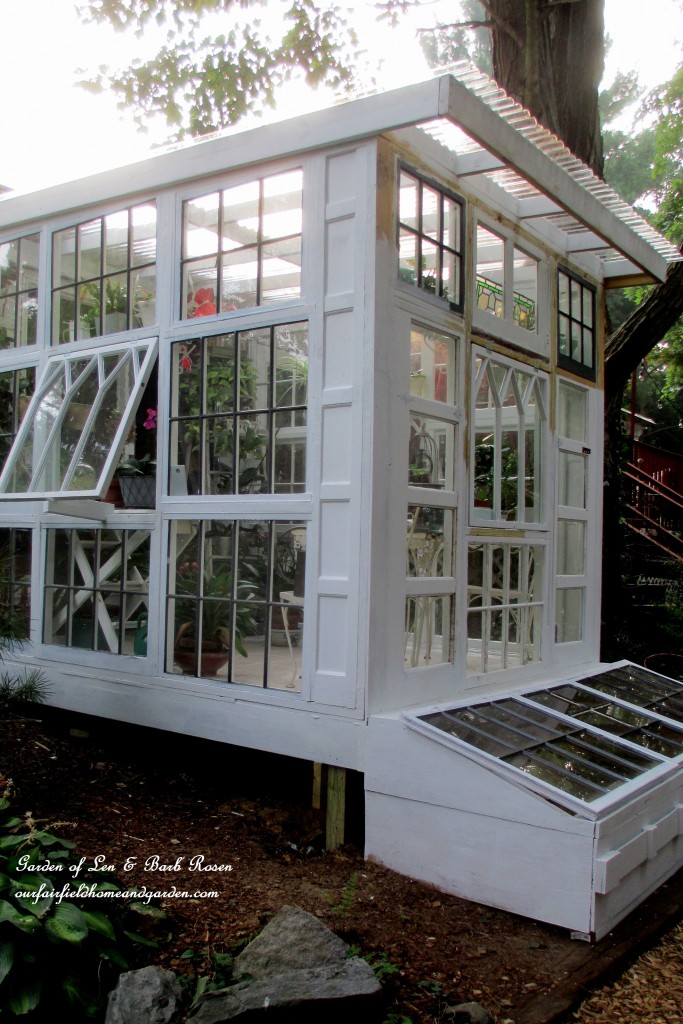
During that time, I also saved money aside knowing that I would need to hire skilled help and muscles to pull this off. In my 60’s, with basic carpentry knowledge, I had the vision but knew I was not up to this task alone. I decided on an 8 ft X 10 ft lean-to structure that would be entered from our Garden Room (formerly a one-car garage at the back of the house). This way there would be less building required (only 3 walls) and heating/cooling sources could be shared.
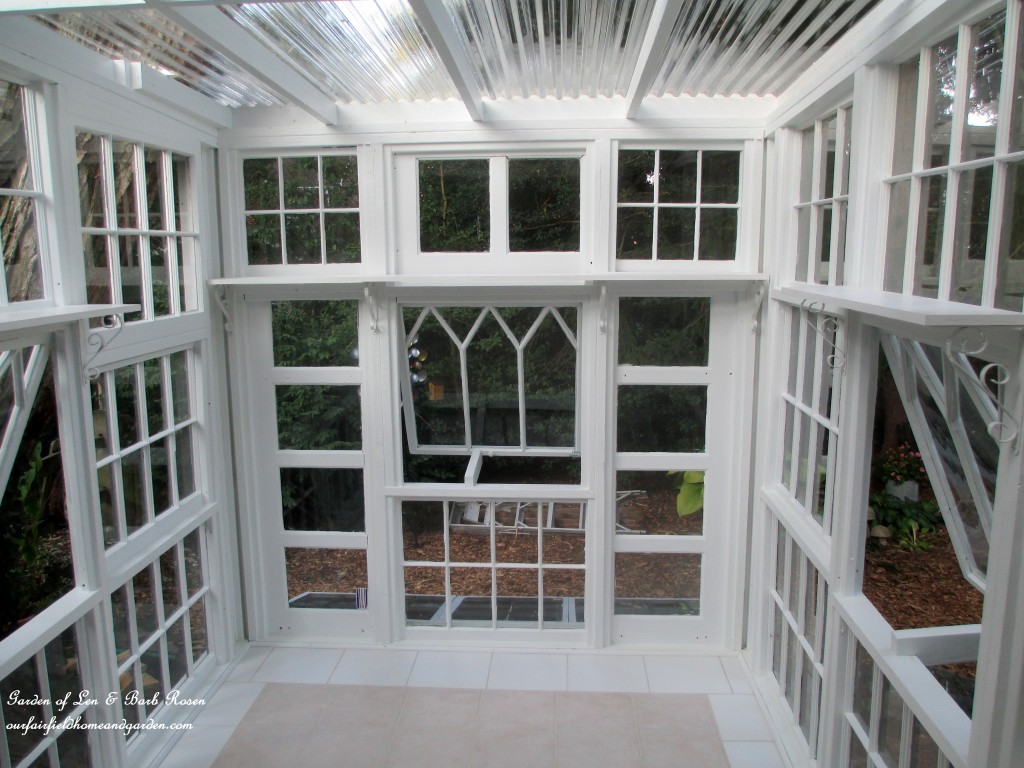
Old Windows ~ a greenhouse in disguise!
It took me a month just to move, divide and replant all the perennials that would be in the way of the project. But finally, the site was ready. I contracted with a wonderful carpenter friend who would work on an hourly basis because this job was so hard to estimate.
Day 1 of the greenhouse build was spent putting in footers and decking joists covered by an 8 ft by 10 ft subfloor. Suddenly, it looked like this was really going to happen!
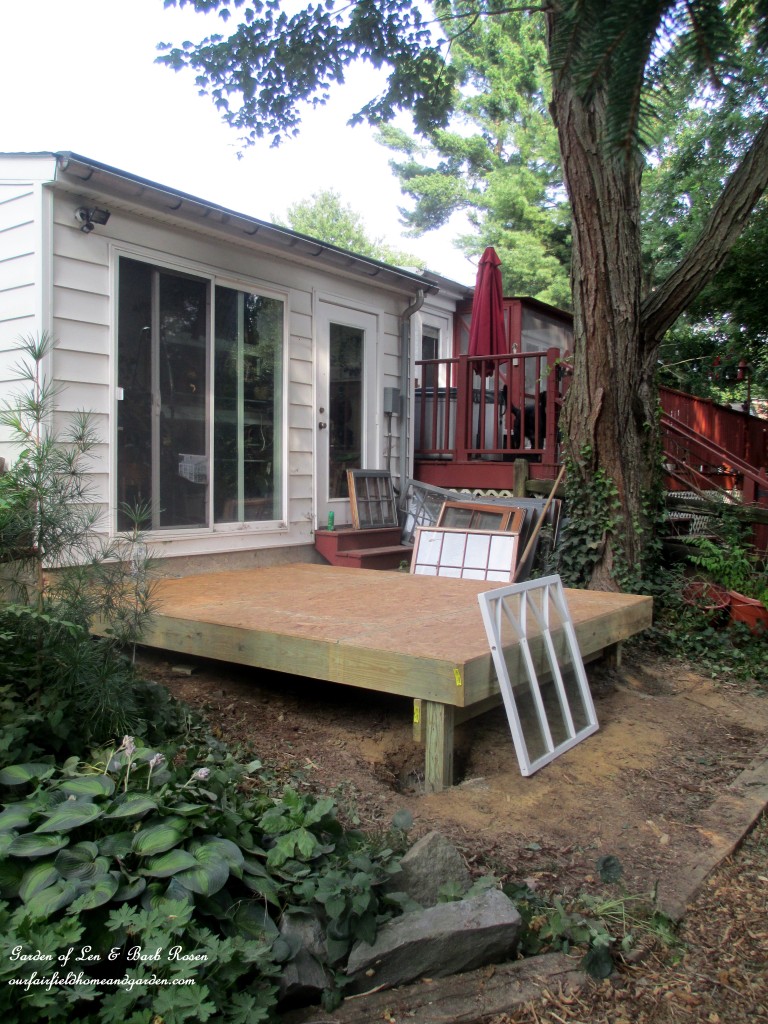
Footers, decking and subfloor in.
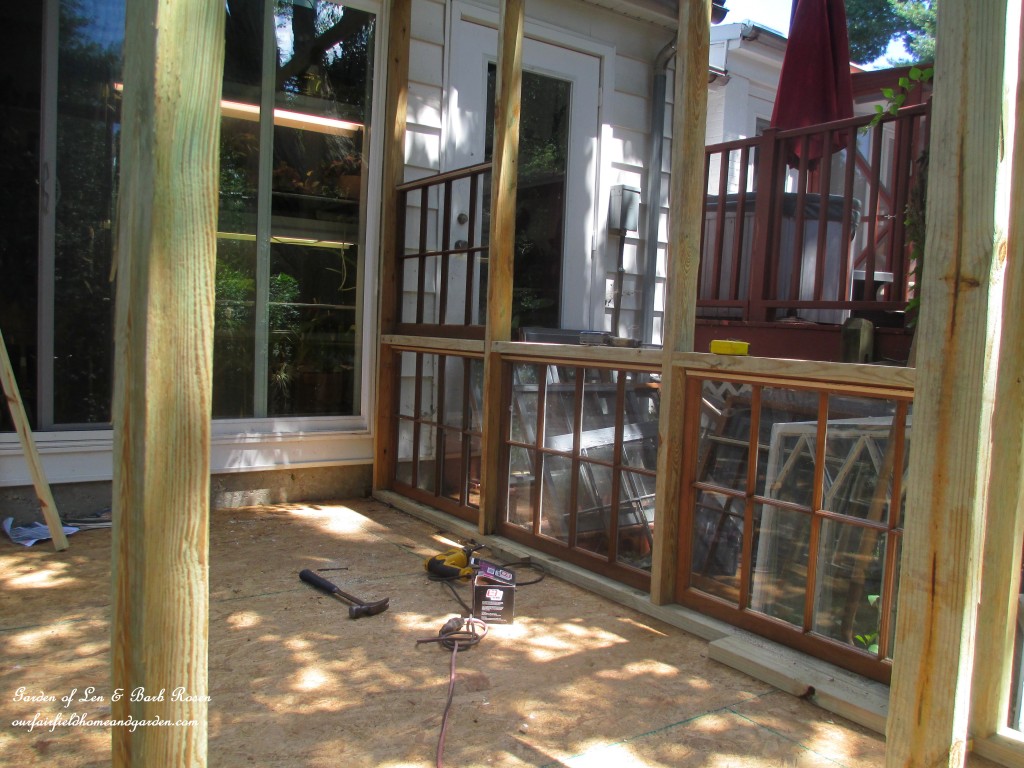
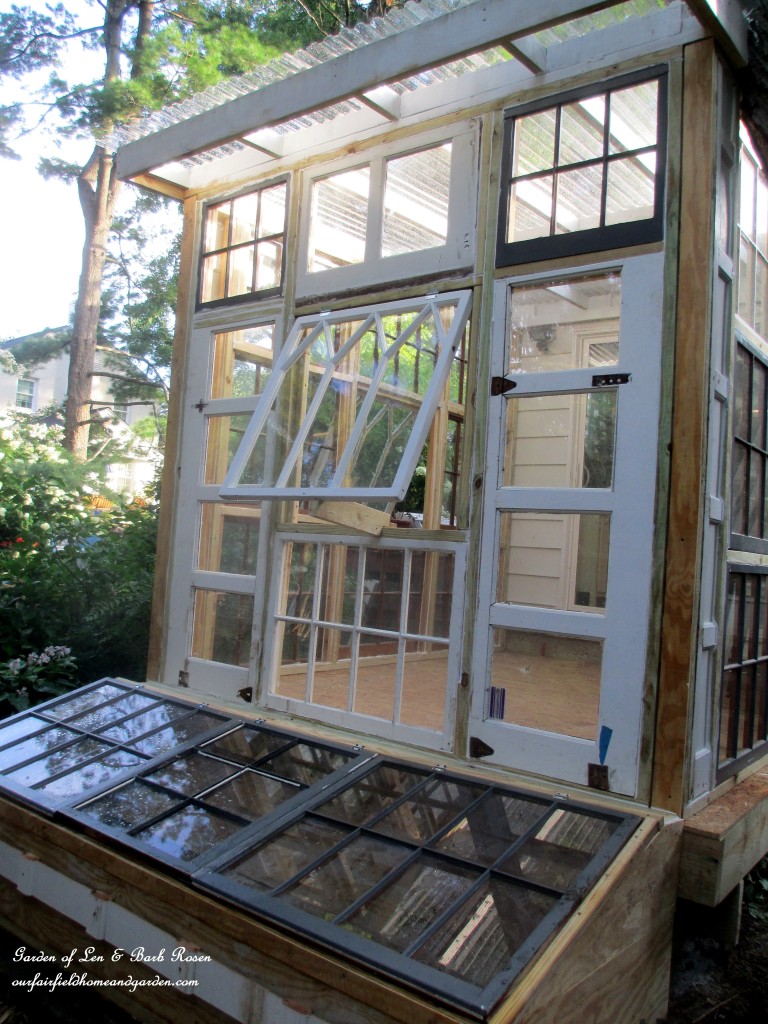
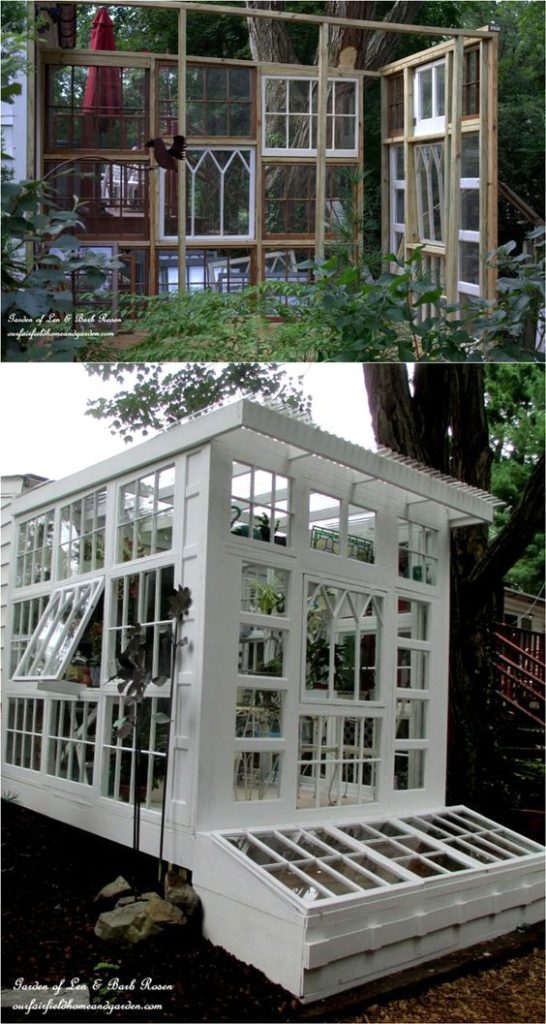
Laying out the windows to see how they would look before building was very important. This was not a standard build of any kind. Mixing up the sizes and shapes is key to getting a very unique look, I found.
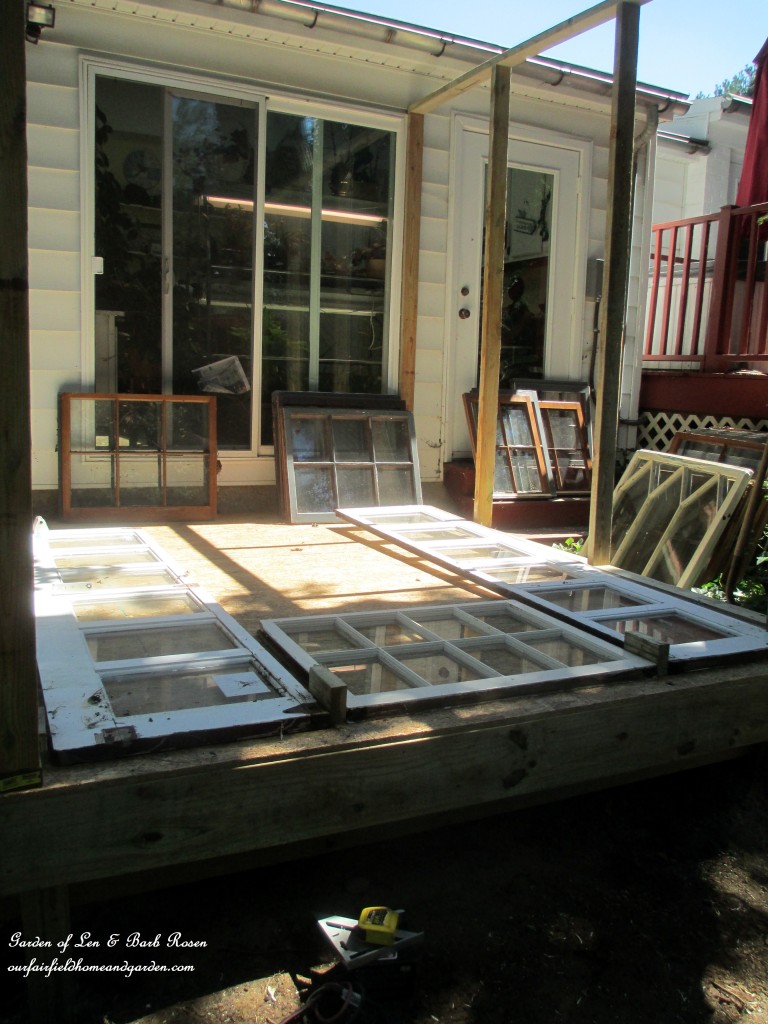
Laying out windows for the wall.
When we replaced our garage doors last year, I saved three panels: two with windows and one all wood . Our old garage doors were incorporated into the end wall of the greenhouse to make vertical windows. The top was trimmed off two of the garage door panels, and one of these cuts used in the center top of this wall.
Greenhouse end wall
The wall framing measurements were based on the largest windows chosen for the base of the wall. I decided each side would feature the antique window in its center, the only windows that would be hinged to open. All the other windows would be framed and fixed in place.
The walls are started.
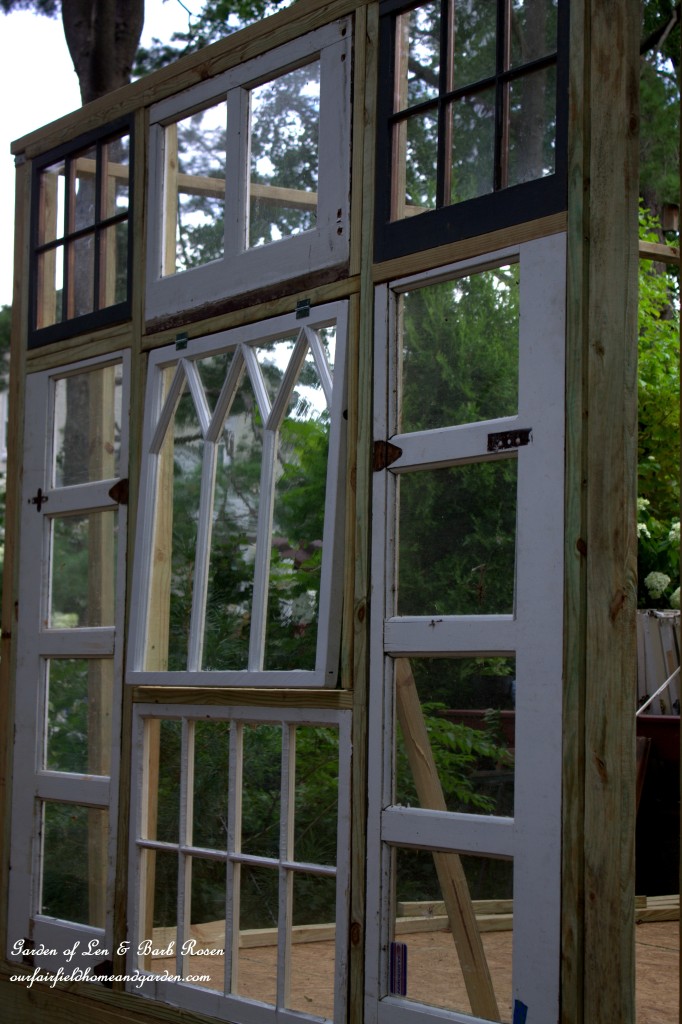
Fitting the windows into the walls required that each window be framed individually. It was like a giant jigsaw puzzle, only the pieces were made up as we progressed. Many wooden window frames were cut to fit and extra wood strips added as needed where there were gaps.

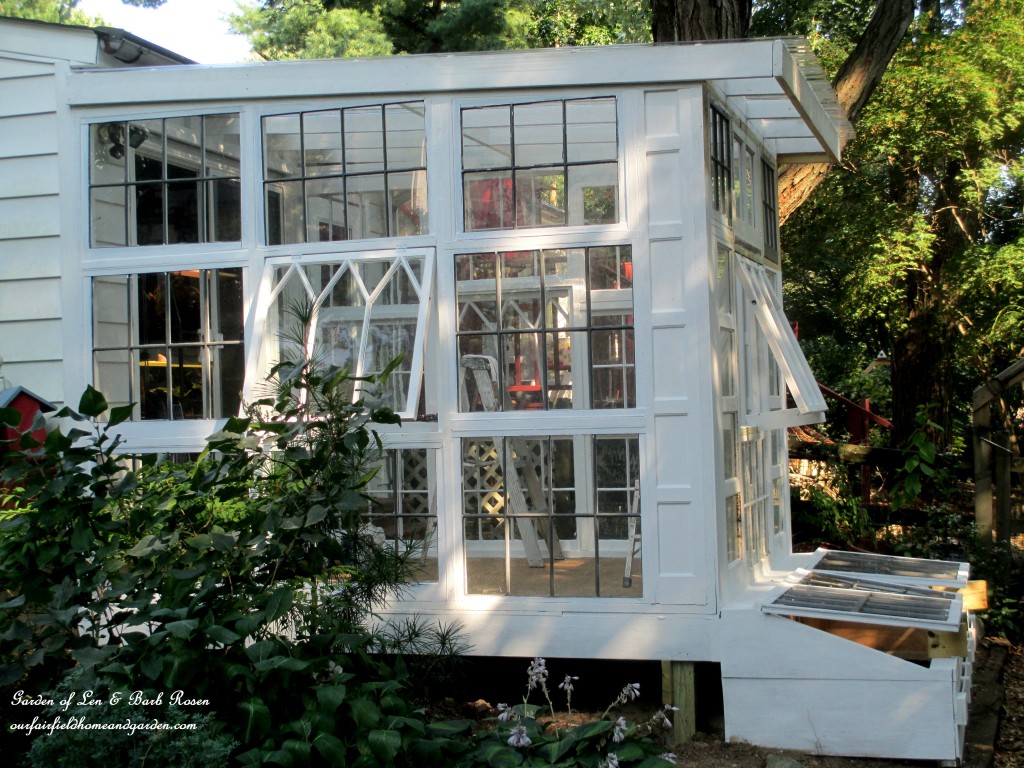
The greenhouse with two walls up.
After three days, the greenhouse walls were finally up and the roof framing in place for the roof panels.
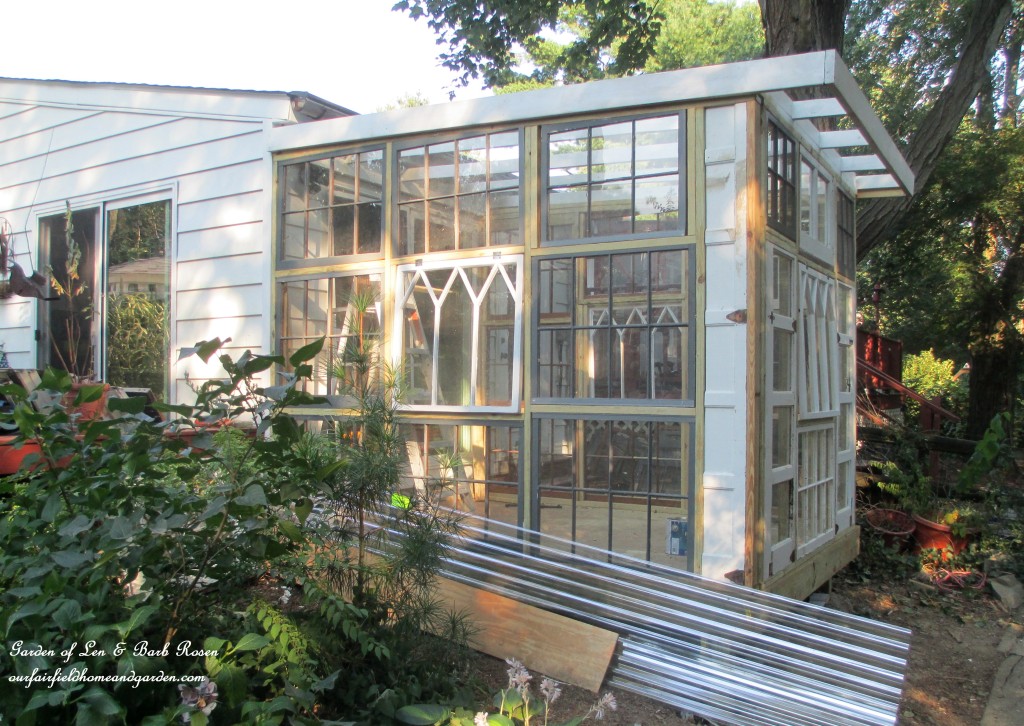
Greenhouse walls finished, now for the roof!
For roofing, I researched and chose Tuftex corrugated polycarbonate clear roof panels from Lowe’s. These panels overlap and are attached to the roof rafters with Tuftex fasteners which have a little waterproof gasket on each screw. An important step is to paint the tops of the roof rafters before attaching the roof panels. Otherwise you will not be able to paint them once the roof is installed.

Repurposed Windows Greenhouse roof installed!
Tuftex 5-Pack Cross Link Polyethylene Solid Roof Panel Closeure Strips (from Lowe’s) sealed the gaps. This clever product fits exactly into the curves of the corrugated roofing to keep out hot and cold air as well as insects.
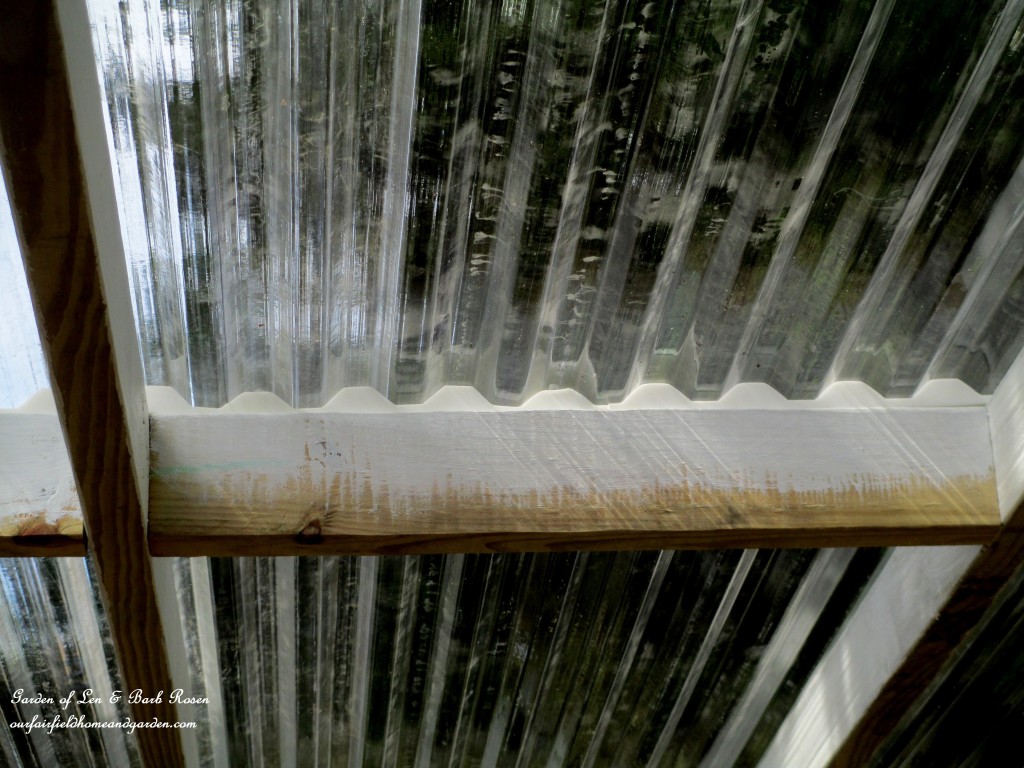
Tuftex Cross Link Polyethylene Solid Roof Panel Closeure Strip seals the gaps!
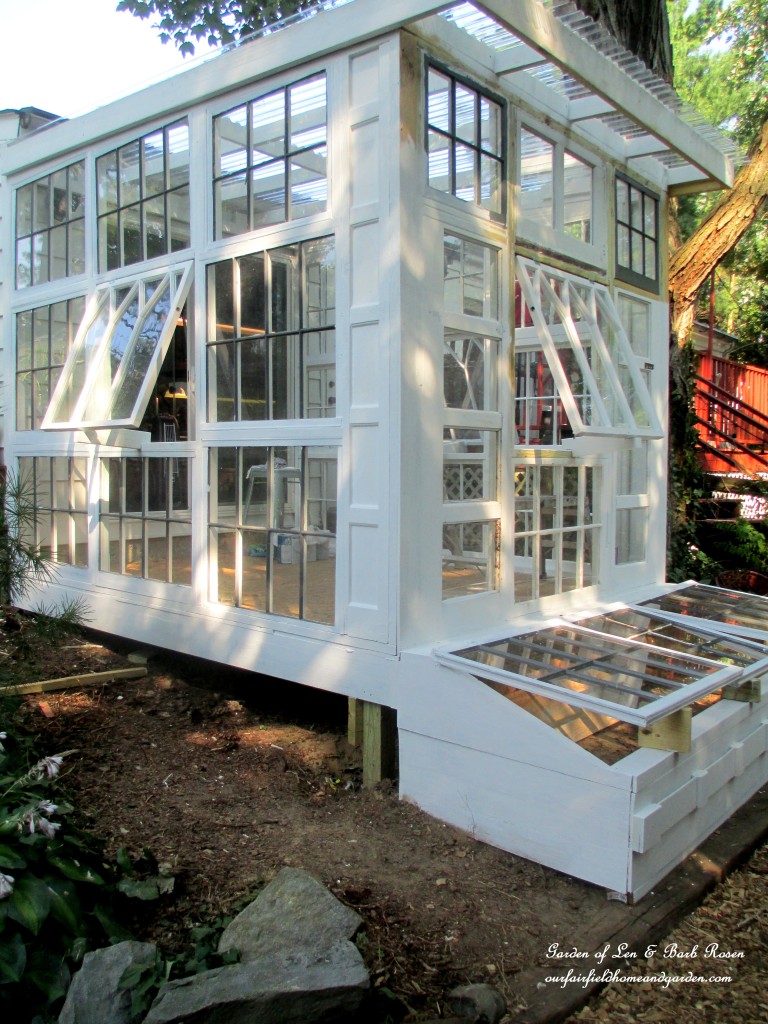
To use up the leftover wood, plywood and a few more windows, we added a large coldframe that runs the entire width of the greenhouse. Trimming the front of the box is the last bit of our old garage door!
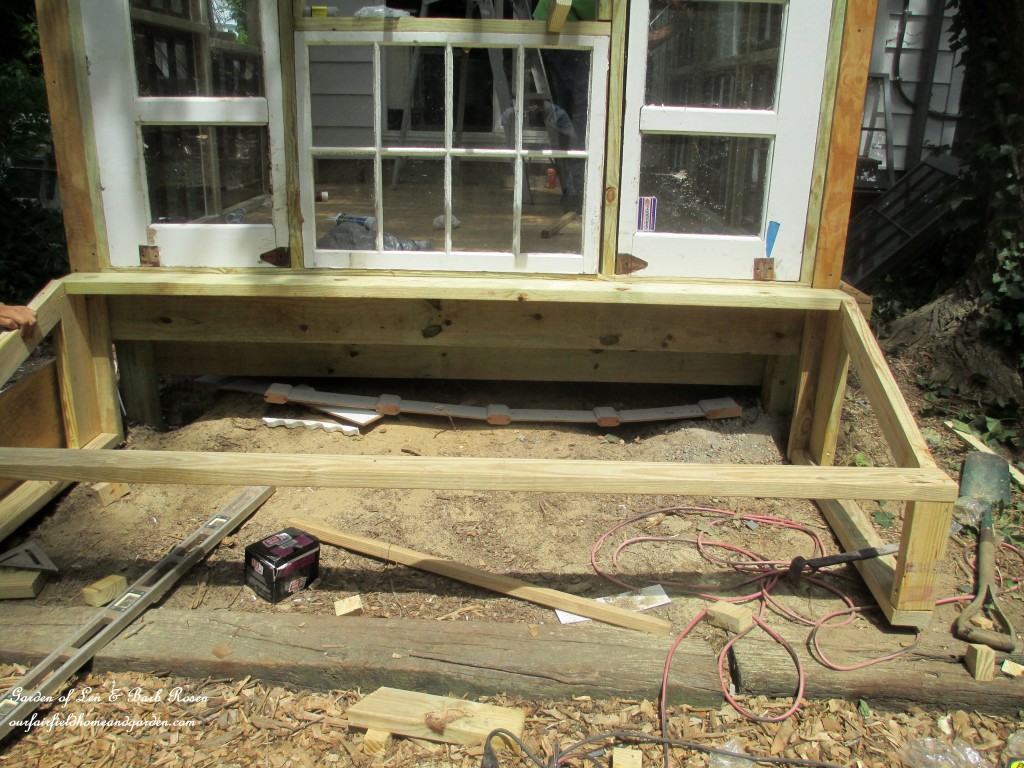
Coldframe under construction.
This large cold frame will be used for winter sowing, protected storage of small potted perennials and starting and hardening off new plants in spring.
Coldframe added to the greenhouse
The building phase took a total of four days. The two front corners were closed in with wood pieces cut from our old garage doors. All the windows and framing were caulked carefully in preparation for painting.

Repurposed Windows Greenhouse construction completed!
To seal and protect them, all framing and windows were painted first with Sherwin-Williams Multi-Purpose latex primer, then with Resilience exterior acrylic latex in extra white. The following pictures show the exterior while being primed.
Exterior of the greenhouse after priming.
Here’s another view of the greenhouse exterior while it was being primed.
Greenhouse being primed
Painting all the windows with primer and paint was tedious. A tip I would pass along is to decide which windows will be used and paint them first before framing them in. With windows from floor to ceiling, this paint job took a long time to complete with lots of laying on the floor and ladder work.
It was now stinking hot in the middle of a humid Delaware August. I made the decision to hire a painter at an hourly rate here, too. Even though I can paint and pitched in, this was going to take me forever and a day by myself. But, the extra expense sure was worth it! That white paint unified all the odds and ends of windows and transformed them into a conservatory!

Painting the interior of the greenhouse structure.
Initially, I had thought I would just seal the subfloor with a good deck paint. But, to my delight, a friend gifted me with 50 square feet of leftover sand-colored ceramic tiles. That was a game-changer! Off I dashed to the clearance bin at the local tile store, where I found white tiles super cheap to create a border that would fill in the rest of the floor space.
After getting a couple estimates, I hired the tiling done. First, a vapor barrier was stapled down (from a new roll I found in a dumpster!), followed by backer board. Then thin set mortar was spread and the tiles put in place with spacers. After a day of drying, the grout was applied. Another day of drying!
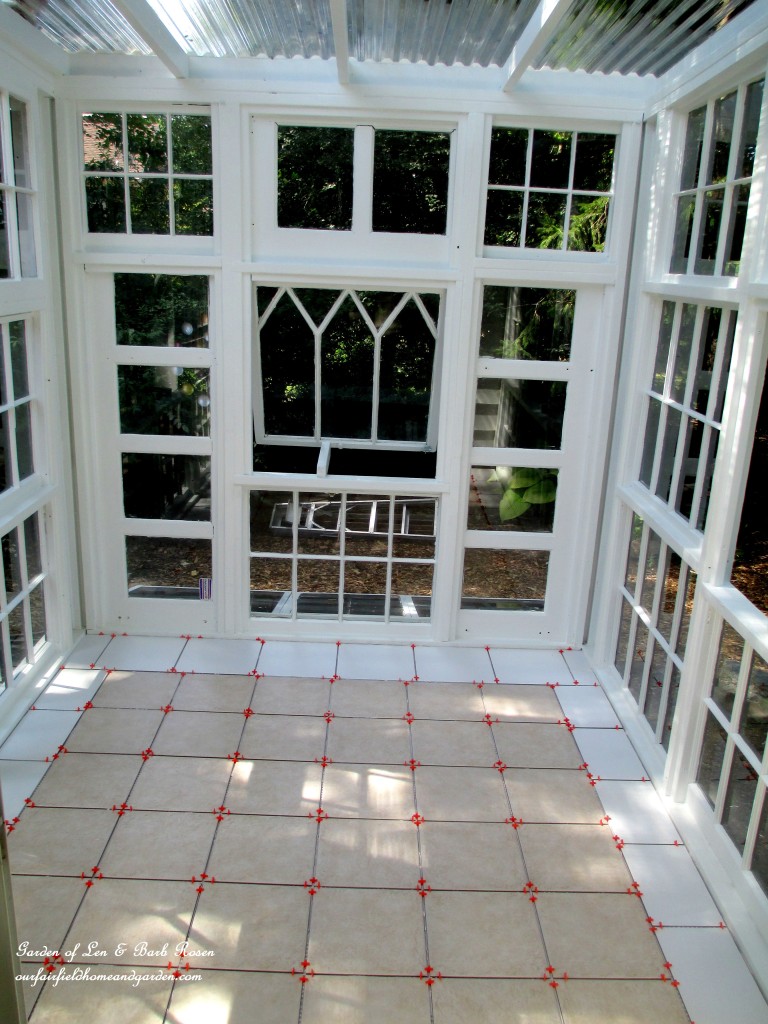
Greenhouse tiling ready for grout.
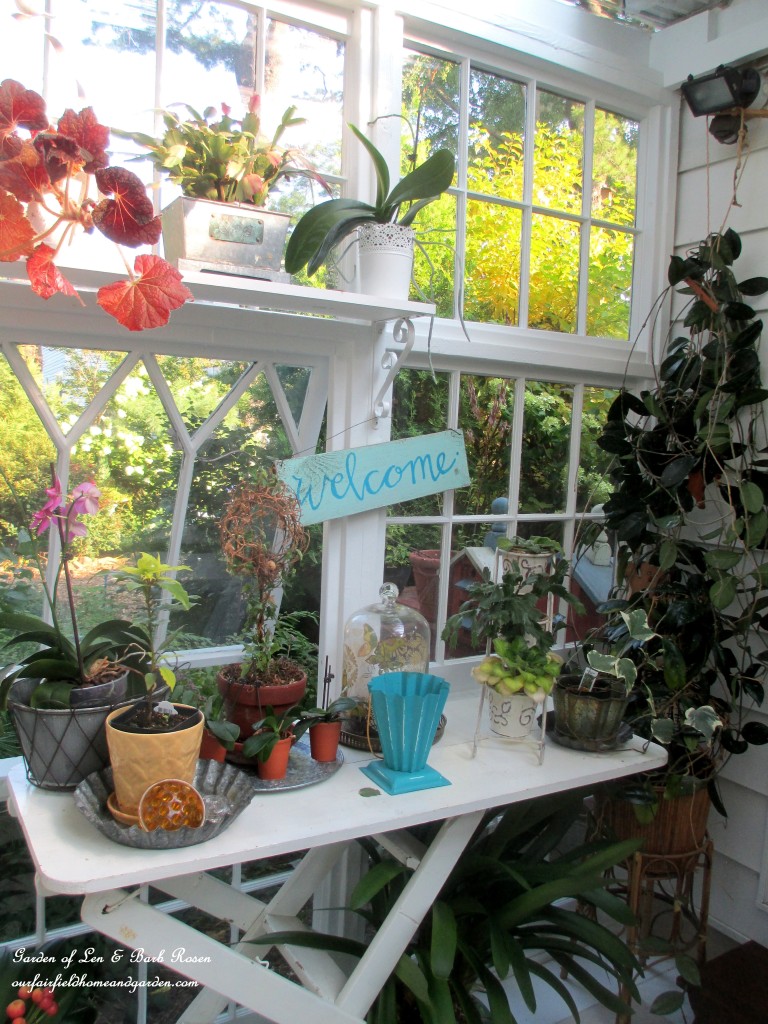
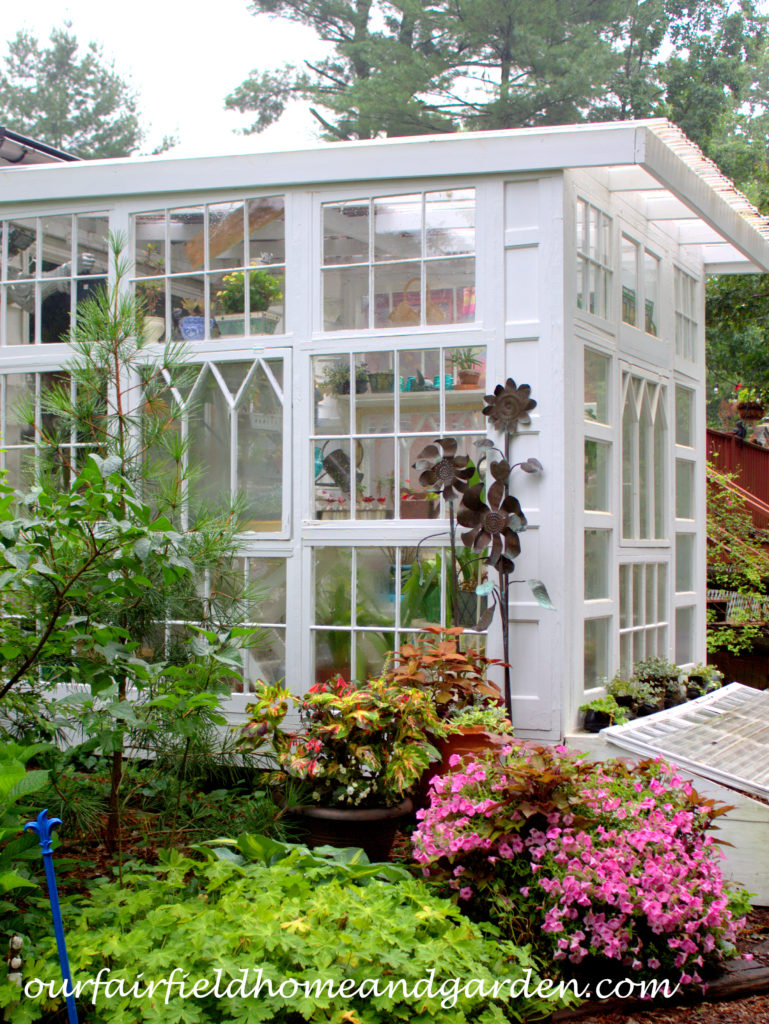
Finally it was move-in day! The grout was dry and I had a blank slate to fill with plants and garden accents. A little turquoise metal table gave me the inspiration to use only blue and green tones to keep the space from becoming too busy. I shopped my garden room for all the pieces and didn’t have to buy anything!
Greenhouse Move-In Day!
An antique wallpaperer’s table, I picked up for a song at a yard sale, is on one side of the greenhouse holding assorted houseplants. Underneath, a few of my potted Clivias have taken up residence.
Wallpaperer’s table holds plants in the greenhouse.
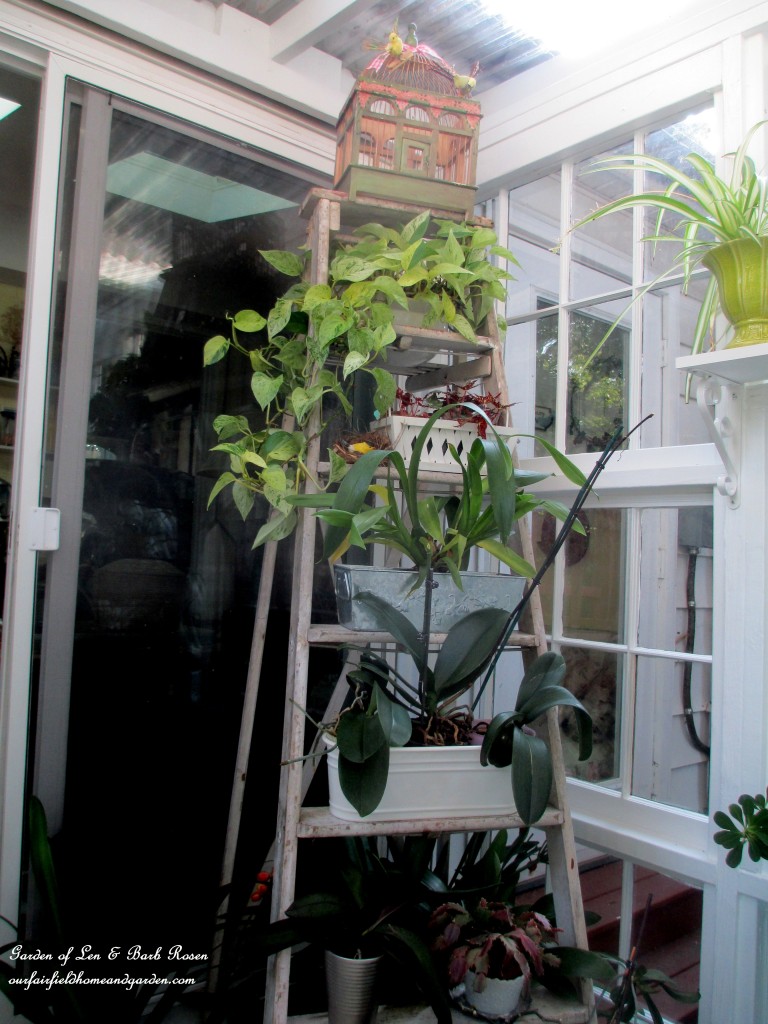
An old white ladder plucked from the curb makes a terrific place to stack lots of plants. Topped by a yard sale birdcage and little crafted birds for whimsy, it makes efficient use of this corner space. Plus, more potted Clivias are grouped underneath.
Ladder as plant stand!
Here’s the greenhouse after one intense day of moving, cleaning and plant grooming. There is still tweaking to do; adding lights, a suspended ladder for hanging plants, making screens and more plants to be brought in this fall. And there is still another day or two of exterior painting to finish.
My glass-topped vintage patio set looks perfectly at home here. It will serve to hold plants as well as be a great spot for sipping coffee and watercolor painting this winter.
And, now those three antique windows are part of real greenhouse and my dream come true!
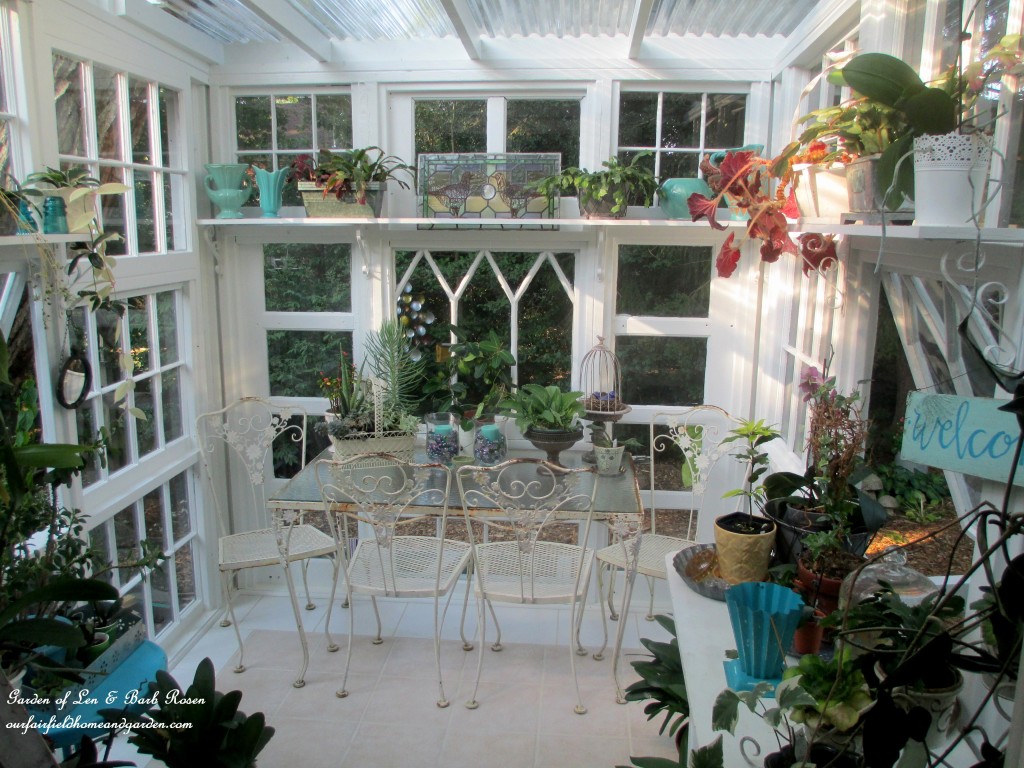
Inside the greenhouse!
(I spent $1,695 on materials – the windows were free except for the initial antique ones. Labor costs were just over $2,000. If you are young, hardy and handy, you could do-it-yourself to save even more!)
Repurposed Windows Greenhouse
(9/12/2015 Update – the painting is finally finished!)

The Repurposed Windows Greenhouse is all painted ~ a true conservatory!

Repurposed Windows Greenhouse ~ Our Fairfield Home and Garden

Repurposed Windows Greenhouse ~ Our Fairfield Home and Garden
Our greenhouse made the news! Check this out!

Click here to see Our Fairfield Home & Garden’s newspaper article!
Our Fairfield Home and Garden’s Repurposed Greenhouse
Greenhouse at Our Fairfield Home and Garden (July 2017)
Our Delaware Master Gardeners are preparing one-minute You-Tube spots on various topics. Recently, I was asked to do a “Master Gardener Minute” about our greenhouse. Sure not used to being video-taped, but here it is!


Absolutely beautiful! Wishing you many peaceful hours in your greenhouse, Barb.
Thanks so much, Jaine! You were a big part in making this happen! Thanks again for the windows!
Barbara, it’s really just GORGEOUS! Congratulations on your happy place
Mareta – thanks for all your “donations” towards making my dream come true!
Barb, this is truly amazing, but I expected nothing less from you.
It is so sweet to finally have a greenhouse of my own, I can’t even tell you!
So Beautiful, Barb!
Thanks, Helen! I must say it turned out even better than I had hoped it would! :)
What can I say? You continue to inspire me every day, my friend. Yes, Conservatory! You did it my friend and it is gorgeous. Kudos!
Con*serv*a*to*ry
a room with a glass roof and walls, attached to a house at one side and used as a greenhouse or a sun parlor.
Yes, it is a conservatory, but not so big! However, it is the perfect size for me and my plants!
Love – love your new greenhouse – it is stunning.
Thank you for sharing the building progress – what an amazing job you and your carpenter did.
Thank you, Erin! It is my new favorite room in the house for sure!
Oh it is absolutely gorgeous!! I’ve always dreamed of having one as beautiful as this! You are so blessed to have asharing!cheived this! Thanks for sharing!
Thanks, Janette! You are so right, I am still pinching myself!!
This is just stunning. It should be in a magazine Barb! I am so happy for your dream to become a reality! Cheers.
Thanks, I have wanted a greenhouse for over 30 years ~ so this is just a complete thrill for me!
I so enjoyed your pictures as the process went on. The final result is amazing.
I know you will enjoy many days inside it. The fun part is the decorating. It looks so cute.
Hope to see lots of pictures as the seasons change. I too would love one.
It has been quite a process! The decorating was just so much fun. It has been such a joy!
Dreams do come true! What a perfect greenhouse, Barb! It is even sweeter because you took such an active role in the whole dreaming, designing, and building process. So many great ideas! I love the ladder plant stand. How wonderful it will feel to sip your coffee and watercolor surrounded by flowers! Enjoy! ♡
Thank you for visiting today, Dawn! Yes, the greenhouse is really just the way I wanted it and will bring me joy for many years to come!
It turned out gorgeous! I love it. How fun to have your own conservatory and painting spot. You will spend many an hour in there with great joy.
That’s for sure, Pamela! My hubby will know where to find me! :)
Barb! It is magnificent! I am filled with envy, but extremely happy for you – that your dream finally came true.
Good things come to those who wait, Karen! It only took 30 years of dreaming (and a lot of hard work!) :)
This is absolutely beautiful! We started saving windows and garbage picking also. What side of the house did you create your greenhouse – north, south? Thanks!
Thanks for commenting,we are loving how it looks too! Who knew old windows could look so great? Our greenhouse is attached to our home on the North West side, Deb.
What a dream! This is so beautiful. Did you have to obtain a builder’s permit before your started? Also, will this impact your property value/taxes?
The same kind of permit like you get for a deck, Kristin, since this is not a structure with water, etc. The carpenter takes care of that end of things! I think it makes our property priceless!
Just gorgeous! I’m so happy for you!
Thanks, Ann! It is like the best present ever!!
Oh, WOW! It’s serendipitous that this post came across my path. I’ve been wanting to do this for SO LONG. Thank you for all the details of what it took to build. I am saving this post for future reference. Btw, I especially love the idea of cold frames. But you gave away windows on Craigslist? Oh, man. Now, I know I need to keep my eyes open for free windows. Thank you so much for sharing this.
So glad you found my post helpful, Juli! Certainly, if I can design and help build a greenhouse, you can too! Since I got all the windows free myself (and you can, too!) I spread the joy to another person who had a greenhouse dream. Actively seek out old windows by letting folks know you are looking. Plus, call window and garage replacement companies in your area. Many old windows end up at the landfill!
You have fulfilled a long held dream of mine. We even have access to many windows as they are left at our transfer station to be shared with all! (well town residents)
I still don’t think it would be feasible for our space but the success you have had sure inspires me to re-think it!
All the choices you made would be those I would also have chosen. You have done a terrific job and it looks like it cost many, many thousands of dollars! Congratulations!
Thanks so much, Emily! I wanted a good-looking, permanent structure for low cost. I think I pulled it off! If you are younger and handier than me, you could do it for less!
Your conservatory is spectacular. I love the synergy and choice of windows. You must feel so relieved now that all that painting is complete. From a 65 year old gardener, be extremely proud of your plan and results. Now enjoy.
Yes, I’m in my sixties too and this was lots of painting! But the work was completely worth it!
Barb,
Of all the recycled window greenhouses I seen online yours is absolutely the best!!! I absolutely love it! One day I want to have one just like it. Thanks so much for posting such an inspiration!
You are so welcome, Dayle! I think the key was finding a few special windows to highlight!
Thank you for sharing all the details!!! Every time I find a “window greenhouse” there never seems to be enough details to DIY it for myself. Yours turned out beautiful!
Great! I tried to show all the steps for folks who want to try making a greenhouse of their own!
OK – absolutely lovely! But a couple of questions for you: your roof looks flat, and it looks like it ends just above you cold frame windows. How will rain drain from your flat roof – toward your house or toward the other end, onto the cold frame? Or are the pictures deceiving and there is an angle and a way for proper water drainage? Love this project, but concerned about these details.
Thanks for your concerns. There actually is a pitch to the roof and it does drain away from the house. As for the coldframe – the roof does dump rain on the lower portion of it, so we will be adding a gutter on the end.
I followed your link from Hometalk. You have some mad skills! What a gorgeous use of windows.Clearly an enormous amount of time and thought went into planning this. This is worthy of a magazine spread.
I love greenhouses, old windows and everything about your creation. Enjoy!
Thank you for all your lovely comments, Alys! I have some skills and hired by the hour help where I wasn’t so skilled. This was a dream realized and I am loving it everyday! :)
barb, i am very happy for you. you are a little younger than i am, but i am determined to begin my search for windows and the ultimate “dream house” for my plants as well. thank you so much for the courage, the pictures and the planned steps. i will also do as much as i can. i adore doing things that become beautiful treasures.. wonderful and gorgeous greenhouse !!!!
You are so welcome, Suzette! My theory was to do everything I could do and lend my vision to what I hired done. I learned a lot working along too!
I love this project!! Have you had any issues with the roof panels?
So far so good, Jacqueline! I’ll do updates as we go through some seasons.
What an inspiration! You had a dream, a vision, and went after it. I am impressed and inspired to rethink my hope for a similar room for our house. Thank you so much for sharing.
One question, since I live in Missouri, how do you keep the area livable in the summer heat?
Thanks for your comment, Ann! Our greenhouse is partly under a large deciduous tree, so it is shaded in the summer months. I know that many greenhouses employ shade cloths over the roof in summer – maybe that would work for you.
Barb, you did a wonderful job! Your greenhouse/conservatory is perfect. I too have a plan to create an upcycled window greenhouse when I complete my 9’x20′ upcycled pallet shed. So close I can almost taste it! My concern, and something I keep checking blogs for information on is roofing. Because I’m not a contractor with knowledge to plan and build an A-frame roof, and I’ve done 99% of the building with my 54 year old hands, I stuck with the slanted roof. I’ve used the same clear corrugated you used on my pergola cover over my front steps, and the wood shed. But I live in Massachusetts where we do get feet of snow! I would have to build a 16″ on center with 2×6″ boards roof to be sure it will hold that load. The space you have between boards would certainly not hold up to our snow load. I’m concerned that with so many boards to support the clear corrugated roofing that my seedlings and plants would not receive enough sunlight to grow a strong plant. That would grow spindly seedlings. I’m hoping to run across a blog of a upcycled window greenhouse with a slant roof that will support the snow load without having to go out every few hours with a snow rake. Partly because the plastic does get brittle in the cold, oops! Partly because I’m not getting any younger!! Thanks for sharing your structure with us. It was very helpful. Enjoy!!
Your pallet shed/greenhouse sounds great, Cher. I hope you will share a picture with me when it is finished! Multi-wall polycarbonate roofing is made that should take your snowfall. Here’s just one source I found on the internet, there were many more. http://www.eplastics.com/multiwall-polycarbonate-sheet I did not choose it because our snowload in Delaware is not as substantial as yours. It is more expensive, of course! :(
You may want to consider hiring some help doing the roofing, it will make the job go faster!Good luck as you finish your build!